Achieving perfectly crispy, golden-brown fried flounder relies on a precise balance of moisture control and high-heat searing, resulting in a delicate, flaky interior encased in a satisfying crunch. This recipe excels by utilizing a light, seasoned flour dredge that adheres well without becoming heavy, and by frying at the optimal temperature to ensure rapid cooking and prevent oil absorption, yielding a flavourful and tender fillet with every bite.
Recipe Overview
| Detail | Value |
|---|---|
| Dish | Crispy Pan-Fried Flounder Fillets |
| Cuisine / category | American Seafood / Weeknight Dinner |
| Prep time | 15 minutes |
| Cook time | 8 minutes |
| Total time | 23 minutes |
| Servings | 4 |
| Difficulty | Easy |
| Key technique | Pan-searing for crispiness |
| Flavour profile | Savory, subtly sweet, herbaceous, crispy exterior, tender interior |
| Best served | Casual weeknight dinners, light lunches |
Ingredients
This ingredient list is designed to create a light, flavourful coating and ensure the flounder cooks to tender perfection. Fresh flounder fillets are the star, enhanced by a simple seasoning blend and a suitable frying oil.
- 4 x 150g fresh flounder fillets, patted thoroughly dry
- 120g all-purpose flour
- 1 teaspoon paprika
- 1 teaspoon garlic powder
- 1/2 teaspoon onion powder
- 1/4 teaspoon cayenne pepper (optional, for a hint of heat)
- 1/2 teaspoon sea salt, plus more to taste
- 1/4 teaspoon freshly ground black pepper
- 2 large eggs, lightly beaten
- 100ml milk
- 150ml neutral oil for frying (e.g., canola, vegetable, or peanut oil)
- 2 tablespoons unsalted butter
- 1 tablespoon chopped fresh parsley, for garnish
- Lemon wedges, for serving
Step-by-Step Method
The method follows a logical flow to ensure consistent coating and perfect searing, moving from preparation to the final crisping stage.
- Step 1 - Prepare Dredging Stations: Set up three shallow dishes. In the first, combine the 120g all-purpose flour with 1 teaspoon paprika, 1 teaspoon garlic powder, 1/2 teaspoon onion powder, 1/4 teaspoon cayenne pepper (if using), 1/2 teaspoon sea salt, and 1/4 teaspoon black pepper. Stir to evenly distribute the seasonings. In the second dish, whisk the 2 large eggs with 100ml milk until well combined. Leave the third dish empty for the coated fillets.
- Step 2 - Dredge Fillets: Working with one fillet at a time, first coat it evenly in the seasoned flour mixture, shaking off any excess. Then, dip it into the egg-milk mixture, allowing excess to drip off, and finally, return it to the seasoned flour, pressing gently to ensure a good coating. Place the coated fillet on the empty dish and repeat with the remaining fillets.
- Step 3 - Heat the Frying Oil: Place a large, heavy-bottomed skillet (cast iron or stainless steel recommended) over medium-high heat. Add the 150ml neutral oil. Heat the oil until it shimmers, or until a tiny piece of flour dropped in sizzles immediately and floats to the surface, indicating it has reached approximately 180°C (350°F).
- Step 4 - Sear the Flounder: Carefully lay 2 of the coated flounder fillets into the hot oil, ensuring not to overcrowd the pan. Add the 2 tablespoons of unsalted butter to the pan as well; it will melt and help brown the fillets. Fry for approximately 3-4 minutes per side, until the coating is a deep golden brown and the fish is opaque and flakes easily with a fork.
- Step 5 - Drain and Repeat: Using a slotted spatula or tongs, carefully remove the fried flounder fillets from the skillet and place them on a wire rack set over a baking sheet to drain any excess oil. This step is crucial for maintaining crispiness. Repeat Step 4 with the remaining 2 fillets.
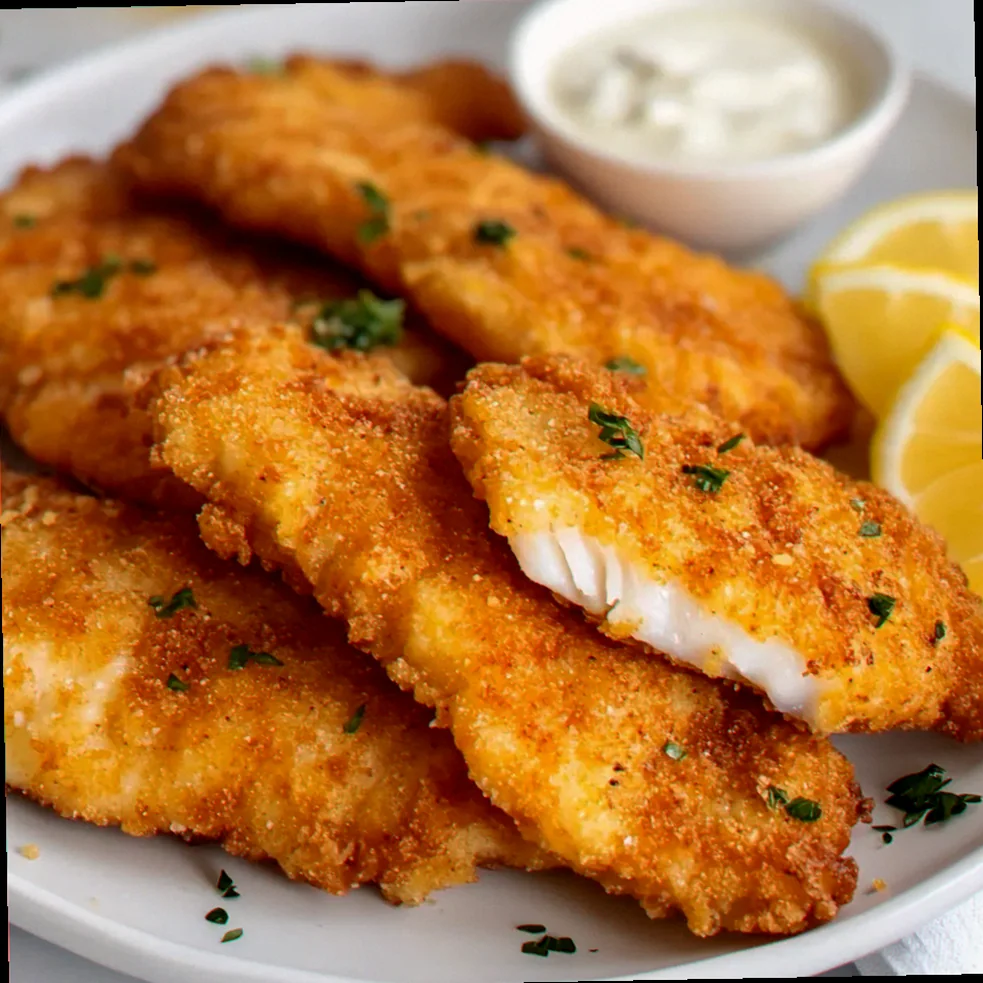
- Final step - Serve: Garnish the crispy flounder fillets with 1 tablespoon of chopped fresh parsley. Serve immediately with lemon wedges on the side for a bright, acidic counterpoint.
The Science Behind Crispy Pan-Fried Flounder Fillets
The magic of crispy pan-fried flounder lies in the Maillard reaction and the principle of rapid moisture evaporation. When the seasoned flour coating meets the hot oil, the sugars and amino acids within the flour undergo the Maillard reaction, a complex series of chemical reactions that create hundreds of new flavour compounds and the characteristic golden-brown colour. Simultaneously, the high heat causes the moisture present on the surface of the fish and within the coating to rapidly turn to steam and escape. This rapid evaporation prevents the coating from becoming soggy and contributes to its delightful crispiness. The butter added during frying contributes desirable flavour notes and aids in achieving an even, rich brown crust. Ensuring the flounder fillets are thoroughly patted dry before dredging is paramount; excess surface moisture will hinder the coating's adhesion and inhibit crisping.
Ingredient Substitutions and Variations
- Flounder Fillets → Cod Fillets or Haddock Fillets: Cod and haddock are excellent substitutes as they are also white, flaky fish with mild flavours. The cooking time may need a slight adjustment; cod and haddock can sometimes take a minute or two longer to cook through. The texture will remain tender and flaky, and the flavour profile will be very similar, making these swaps work well.
- All-Purpose Flour → Gluten-Free Flour Blend: For a gluten-free variation, a 1:1 gluten-free baking flour blend can be used as a direct substitute for the all-purpose flour. Ensure the blend contains xanthan gum for binding. The resulting crispiness will be comparable, though the flavour might be slightly different depending on the blend used. This swap works well for those with gluten sensitivities.
- Dietary variation - Dairy-Free: To make this recipe dairy-free, omit the 2 tablespoons of unsalted butter added during frying. The flounder will still achieve a good crispiness from the oil alone, though the richness imparted by the butter will be absent.
- Flavour variation - Zesty Lemon Herb: For a brighter flavour, add the zest of 1/2 lemon to the seasoned flour mixture and increase the fresh parsley garnish to 2 tablespoons. This adds a lovely herbaceous and citrusy note that complements the fish beautifully.
Make-Ahead, Storage, and Reheating
While fried fish is best enjoyed immediately for optimal crispiness, some elements can be prepared in advance. The seasoned flour mixture can be prepared up to 2 days ahead and stored in an airtight container at room temperature. The egg-milk wash can be prepared a few hours ahead and refrigerated. However, the dredging and frying should ideally be done just before serving. If you must reheat, place the cooled fried flounder on a baking sheet in a single layer. Reheat in a preheated oven at 190°C (375°F) for 6-8 minutes, or until heated through and crisp again. Avoid microwaving, as it will result in a soggy texture.
What to Serve With Crispy Pan-Fried Flounder Fillets
Crispy pan-fried flounder fillets pair wonderfully with a variety of sides that complement their light, flaky texture and delicate flavour. For a classic pairing, consider serving with creamy coleslaw, its cool crunch providing a textural contrast to the crispy fish. Another excellent accompaniment is lemon-garlic roasted asparagus, its bright acidity and slight char echoing the flavours of the flounder. For a more substantial meal, serve alongside classic potato wedges, perfect for soaking up any residual pan juices. These combinations are ideal for casual weeknight dinners or relaxed weekend lunches.
Common Mistakes and How to Avoid Them
- Mistake 1: Not drying the fish thoroughly - This leads to the coating sliding off and prevents the oil from properly crisping the exterior. Always pat flounder fillets completely dry with paper towels before dredging.
- Mistake 2: Overcrowding the pan - This lowers the oil temperature, causing the fish to absorb too much oil and become greasy rather than crispy. Fry in batches, ensuring there is ample space between fillets.
- Mistake 3: Frying at the wrong temperature - Oil that is too cool will result in greasy fish, while oil that is too hot will burn the coating before the fish is cooked through. Use a thermometer to ensure the oil is around 180°C (350°F) and adjust the heat as needed to maintain this temperature.
Frequently Asked Questions
Can I make Crispy Pan-Fried Flounder Fillets ahead of time?
While it is best to serve this dish immediately after frying for maximum crispiness, you can prepare the seasoned flour mixture up to 2 days in advance and store it in an airtight container at room temperature. The egg-milk wash can be made a few hours ahead and refrigerated. However, the dredging and frying process should be done as close to serving time as possible. Reheating is possible in a 190°C (375°F) oven for 6-8 minutes.
How do I know when Crispy Pan-Fried Flounder Fillets is cooked properly?
You will know the flounder is cooked properly when the coating is a deep golden brown on both sides, the fish is opaque throughout, and it flakes easily when tested with a fork. The internal temperature should reach approximately 63°C (145°F).
What is the best substitute for flounder in Crispy Pan-Fried Flounder Fillets?
Cod fillets or haddock fillets are excellent substitutes for flounder in this recipe. They are also white, flaky fish with mild flavours and will yield a similar tender interior and crispy exterior. Adjust cooking time slightly if necessary.